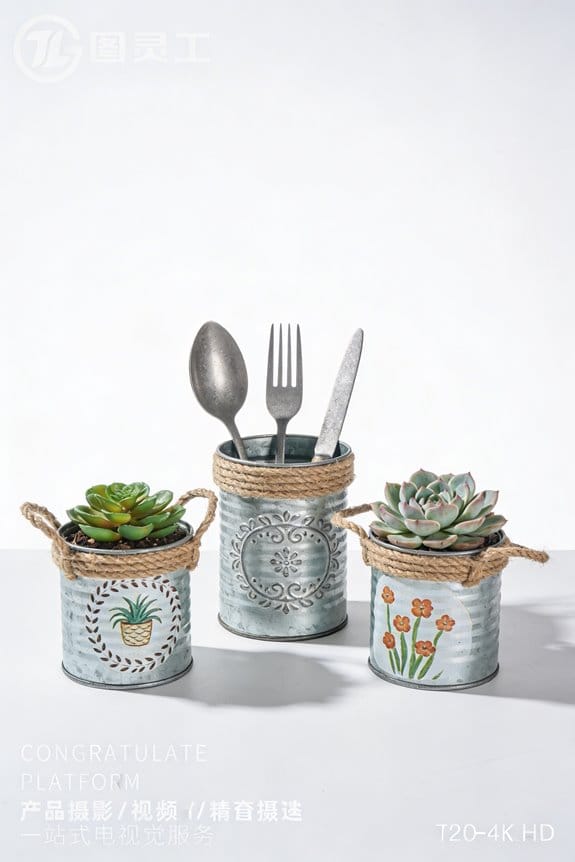
Upcycling tin cans into utensil holders or planters is a great way to organize, save space, and go green. You’ll need six empty tin cans, a wooden block base measuring 11×6 inches, screws or nails, and a hot glue gun for assembly. Decorate the cans with vibrant duct tape or spray paint for a personal touch. You can even add fun handles for style. Ready to release your creativity? Let’s explore this project further and get crafting!
Key Takeaways
- Gather six empty tin cans and a stable wooden base to support your utensil holder or planter project.
- Clean the cans by soaking them in warm, soapy water to remove any labels.
- Decorate the cans with paint, fabric, or washi tape to personalize and enhance their appearance.
- Drill drainage holes in the bottom of cans designated for planters to prevent waterlogging.
- Secure the decorated cans to the wooden base using a hot glue gun for stability and a finished look.
Why Should You Upcycle Tin Cans for Utensil Holders and Planters?
Do you ever feel like your kitchen counter is cluttered with random utensils? Upcycling tin cans into utensil holders can be a practical solution for keeping your space tidy while adding a touch of personality. Plus, by repurposing these cans, you’re helping to reduce waste that would otherwise end up in landfills.
Creating utensil holders from tin cans doesn’t just keep your kitchen organized; it also makes it easier to find your favorite spatula or whisk when you need it. You can even add a splash of color or some fun fabric to make each holder uniquely yours.
Now, if you’re into gardening but want to keep costs low, tin cans can easily be transformed into charming planters. The best part is they can cost just a few cents! Whether you’re starting herbs on your windowsill or creating an outdoor garden, these planters allow you to showcase your green thumb while sprucing up your outdoor space.
So, why does this matter? Upcycling tin cans not only helps your home stay organized but also inspires you to think creatively. By exploring innovative DIY projects, you can improve your skills while promoting sustainable practices that benefit the environment. Plus, pairing these holders with eco-friendly wooden utensils creates a sustainable and stylish kitchen setup.
Give it a shot! Your kitchen and garden will thank you for it, and you might just discover a new hobby along the way. What’s stopping you from diving into this fun and eco-friendly project?
Essential Supplies for Your DIY Utensil Holder and Planter

Have you ever looked at your kitchen drawers and thought, “Where did all my utensils go?” It’s frustrating, isn’t it? When it comes to organizing your utensils or even creating a fun planter, gathering the right supplies makes all the difference in the world.
For a DIY utensil holder, you’ll want to grab six tin cans. A wooden block, about 11×6 inches, works beautifully as a base, along with some screws or nails to hold everything together. If you’re leaning toward making a planter, be sure to coat the inside of each tin can to prevent rust. Drilling holes at the bottom for drainage is a smart move, too—no one wants waterlogged plants!
Here’s a simple tip: using a hot glue gun can really speed things up. It’s a quick and easy way to attach those cans to your wooden base, so your project comes together in no time. And let’s not forget about the benefits of using recycled materials. They not only help the environment but also add a unique touch to your project.
Incorporating eco-friendly materials can enhance sustainability, much like the rapidly renewable resource aspect of bamboo in home products.
So, why does this matter? It’s all about making your DIY projects both creative and sustainable. Choosing materials that reflect your personal style keeps things fresh and fun!
Before you get started, remind yourself that this is not just a project; it’s a chance to express who you are. At the end of the day, you’re left with something both functional and artistic. Give it a shot—your kitchen or garden will thank you! What will you create first?
Recommended Products

Note: Garden beds are not included with your purchase of the Wall Trellis.

Large capacity: Provide enough growth space for deep-rooted plants like potatoes, tomatoes, broccoli, etc. Tall enough to keep pets away from the garden planter and give you easy access!

Versatile and Spacious Design: 4x2x1ft, large size oval planter box, Bottomless design provide good drainage, keep weeds away from soil, defense against pests, and protect your plants.With a wide range of sizes and styles to choose from, our garden beds can be customized to fit your space and style preferences.
Decorating Your Tin Cans: Tips and Techniques

Are you tired of plain old tin cans cluttering your space? Decorating them can be a fun, creative outlet that adds a personal touch to your home. Start by peeling off those labels—this gives you a clean surface to work with.
Here’s the trick: grab some duct tape or spray paint and let your imagination run wild! Think about colors that really pop or patterns that blend seamlessly with your decor. If you want to take it up a notch, techniques like decoupage can add a wonderful texture, or you could wrap the cans in fabric or ribbon for something a bit different.
If you’re planning to use these cans as planters, don’t forget to make drainage holes. Trust me, your plants will thank you for it! Finally, consider adding some fun elements like gold tape for a touch of glam or painted handles that really make your creation stand out.
Using eco-friendly materials in your decorations can further enhance the sustainability of your project.
These tips for decorating tin cans can turn something ordinary into a stylish hanging planter or a cute storage solution. So, why not give it a shot? You might just create a unique piece that becomes a conversation starter!
Recommended Products

UNIQUE METAL BIRDHOUSE: This hand-painted hanging birdhouse is the perfect roost to complement your space. It is suitable for outdoor use during the warmer months and should be brought inside when the songbirds fly south. (Bow not included.)

UNIQUE METAL BIRDHOUSE: This hand-painted hanging birdhouse is the perfect roost to complement your space. It is suitable for outdoor use during the warmer months and should be brought inside when the songbirds fly south. (Bow not included.)
RUSTIC AGED GALVANIZED STEEL DESIGN – Features a mottled gray galvanized finish with raised vertical and horizontal panel lines that create a vintage livestock trough appearance. Rustic styling enhances garden spaces while creating an attractive focal point. Ideal for farmhouse, traditional, and decorative outdoor environments.
Step-by-Step Instructions for Creating Utensil Holders
Got a bunch of tin cans hanging around, and no idea what to do with them? Let’s turn those old soup cans into a stylish utensil holder that’ll keep your kitchen looking organized. It’s a super easy project you can tackle in just a few steps.
Start by gathering up your materials. You’ll need six empty soup cans, an 11×6 wooden block—this could be a scrap piece if you’ve got one lying around—some decorative paints, and a handle from your local hardware store. Don’t worry if you can’t find a wooden block that size; you can always cut one down or use a sturdy piece of cardboard instead.
Next up, you’ll want to remove the labels from the cans. This part can be a little messy, so try soaking the cans in warm, soapy water for a few minutes to help get the glue off. Once the labels are gone, you can go ahead and decorate them. Use duct tape for that rustic vibe or paint them up to match your kitchen’s colors. Seriously, this is where you can let your personality shine through.
After your cans are looking fab, it’s time to set them on the wooden base. Arrange your cans however you like; you can spread them out or cluster them together. Grab a hot glue gun and stick those cans down. Make sure to press each one firmly for about a minute to ensure it holds. Allow a couple of minutes for everything to dry, and you’ll be all set.
Now you’ve got a creative utensil holder that’s both functional and stylish! It’s fantastic for keeping your silverware in order, whether you’re hosting a family dinner or packing for a picnic. You can easily swap out the decorations once you want a change, too. So, what will you decorate yours with? Remember that using reusable items in your kitchen projects helps reduce waste and supports sustainability.
Recommended Products

This insulated fortress is built to safe keep anything you're craving, whether it's a hearty sub that tastes just as fresh as when you packed it or a cold drink ready to be relished

36-piece disposable chafing dish buffet set includes - (6) foldable chafing dish wire racks + (6) half-size aluminum water pans + (6) half-size food pans + (6) foil lids + (6) chafing fuel cans - (2.5 hours each; 1 fuel cans for each buffet warmer)

BARTENDING KIT: Designed by bartenders, this 23 piece bar tool set has a stunning black mirror finish and is presented in a striking black bamboo stand. Equipped with all the bar accessories you need to create delicious cocktails from the comfort of your home.
Unique Tin Can Planter Ideas
Have you ever looked at a tin can and thought it was just a container? I get it; they seem pretty basic. But here’s the truth: with a bit of creativity, you can turn those cans into vibrant planters that really bring life to your space. If you’re worried about them rusting, don’t be! A little decoupage can add colorful designs while protecting them.
Remember to add drainage holes to the bottom of your cans. It’s crucial for keeping the plants healthy, especially if you’re using them outdoors. Now, if you’re feeling festive, how about making some rainbow-themed planters for pride celebrations? Or, if you want something unique, consider using old denim to create a trendy vibe.
Rustic touches can really personalize your projects, too. Think vintage seed packets or chalkboard tags to label your plants. And if space is an issue—no worries! Hanging planters made from tin cans can give you a charming vertical garden without taking up extra room. Using water-resistant materials can help protect your planters and prolong their usability outdoors.
Recommended Products

This Product Is Easy To Use

Charming Bunny Design: Each bucket features embossed bunny silhouettes that add a whimsical touch to any setting. Ideal for Easter festivities, these buckets serve as perfect containers for egg hunts, floral arrangements, or as playful decor in children's rooms.

Material: Made of heavy duty cast iron, strong and durable construction with anti-rust coating, rustic brown finish, which is weather resistance.
Tips for Successful Upcycling
Upcycling tin cans can be such a fun and fulfilling project, don’t you think? One common issue people face is waterlogging when using them for plants. To tackle this, always remember to drill a few drainage holes at the bottom of the cans. It’s a small step that can make a big difference in keeping your plants happy.
Before you get too excited, take a moment to remove the labels. Once that’s done, it’s time to bring out your creativity. Think about decorating the cans with paint or washi tape. Just a heads-up: keep the inside unpainted. Trust me, messy paint transfers can be a hassle.
Here’s the trick for making a stylish utensil holder: add a handle! You can find these in any hardware store, and they really amp up the look. When it comes to attaching cans to a wooden base, a strong adhesive like hot glue is your best friend. It’ll keep everything nice and stable while you admire your handiwork.
Now, for a personal touch, why not explore layering fabrics or prints around the can? This can really make your upcycled project stand out. Honestly, don’t shy away from getting creative!
Using biodegradable and recyclable materials when decorating or sealing your cans can also reduce your environmental impact.
Recommended Products

DURABLE MATERIAL: This sleek, rustic planter pot is made from a thick gauge corten steel that will develop a beautiful rust patina naturally over time

SELF-WATERING PLANTER: With the innovative TruDrop One self-watering system, you can go up to 6 weeks without watering your plants. The plants’ roots take the water as needed, avoiding under or over-watering. The simple water-level indicator reduces watering frequency and lets you know when you need to fill the water reservoir, reducing water and fertilizer usage.
# Galvanized and rustproof: galvanized Before Welding. Made of heavy duty galvanized wire, providing a maximum durability and corrosion resistance and long life. Wider weave not too stiff, the material will confirm to rolled shape as tree guards for fruit trees.
Creative Ways to Showcase Your Finished Projects
How can you make your finished upcycled projects stand out? Start by capturing their beauty with high-quality photos under natural light. This not only enhances the colors but also emphasizes the unique designs. Don’t forget to showcase the paint colors and decorations you’ve used on your tin can projects—those details matter!
Integrating your creations into home decor is another fun way to highlight your craftsmanship. Think about placing them in well-lit spots where family and friends can appreciate your work. It’s like giving your projects a little stage! Have you considered sharing your finished pieces with online crafting communities? Posting those photos can spark feedback, ideas, and even inspire others to try their hand at upcycling.
Here’s the trick: Create themed displays for extra visual impact. Pairing different utensil holders with matching kitchen decor can add a pop of color that really draws the eye. Similarly, showcasing colorful planters together can create an inviting vibe. So, how can you mix and match what you have to make your space feel more lively?
Truth is, the more you engage with your projects and show them off, the more rewarding the whole process becomes. Additionally, choosing materials that are sustainable and compostable can further enhance the eco-friendly appeal of your projects. So, what will you create next?
Frequently Asked Questions
Can You Use Tin Cans as Planters?
Absolutely, we can use tin cans as planters! Picture vibrant blooms exploding from shiny, upcycled cans, bringing life to any corner. With some drainage holes and creativity, these cans transform into adorable garden accents. Let’s get started!
Can I Use a Planter as a Utensil Holder?
Yes, we can absolutely use a planter as a utensil holder! It’s a fun way to achieve utensil organization, while adding a stylish touch to our kitchen. Let’s embrace creativity and practicality in our home!
How to Make a Planter From a Can?
To make a planter from a can, we’ll embrace our recycling creativity! After cleaning it, we’ll drill drainage holes, fill it with potting mix, and add plants. Voilà, we’ve given new life to an old can!
What Can You Make Out of Old Tin Cans?
We can make various things from old tin cans through creative recycling—think stylish candle holders, unique storage solutions, or even whimsical garden decor. The possibilities are endless; let’s release our creativity together!